
TL;DR:
- Appliance seals prevent leaks and maintain efficiency, but coastal conditions accelerate their failure.
- Proper tools, cleaning, and correct installation are crucial for effective DIY seal repairs.
- Regular inspections and professional help ensure long-lasting seals and appliance performance.
A leaking refrigerator door or a washer that puddles water on your laundry room floor can throw off an entire day. For Monmouth County homeowners and small business owners, a failed appliance seal is rarely just an inconvenience. It can mean soaring energy bills, water damage to floors and cabinetry, and the kind of mold problem that costs far more to fix than the original repair. This guide walks you through exactly what appliance seals do, what causes them to fail, and how to repair or replace them correctly, with honest guidance on when calling a local pro is the smarter move.
Table of Contents
- Understanding appliance seals: What they do and why they fail
- Tools and materials: What you need before you start
- Step-by-step guide: How to repair or replace appliance seals
- Troubleshooting and common mistakes: What to watch out for
- How to confirm success: Testing and maintaining your new seals
- The overlooked truth about appliance seal repairs
- Get professional appliance seal repair—fast and local
- Frequently asked questions
Key Takeaways
| Point | Details |
|---|---|
| Spot seal issues early | Watch for leaks, mold, or loose doors to know when a repair is needed. |
| Use the right tools | Gather screwdrivers, cleaning supplies, and a hairdryer before starting any seal repair. |
| Follow step-by-step instructions | Carefully replace or patch seals to restore appliance performance quickly and safely. |
| Beware of Monmouth’s climate | Coastal humidity and salt can speed up seal failure, so regular checks matter most here. |
| Know when to call a pro | For tough repairs or warranty concerns, local experts provide fast, reliable service. |
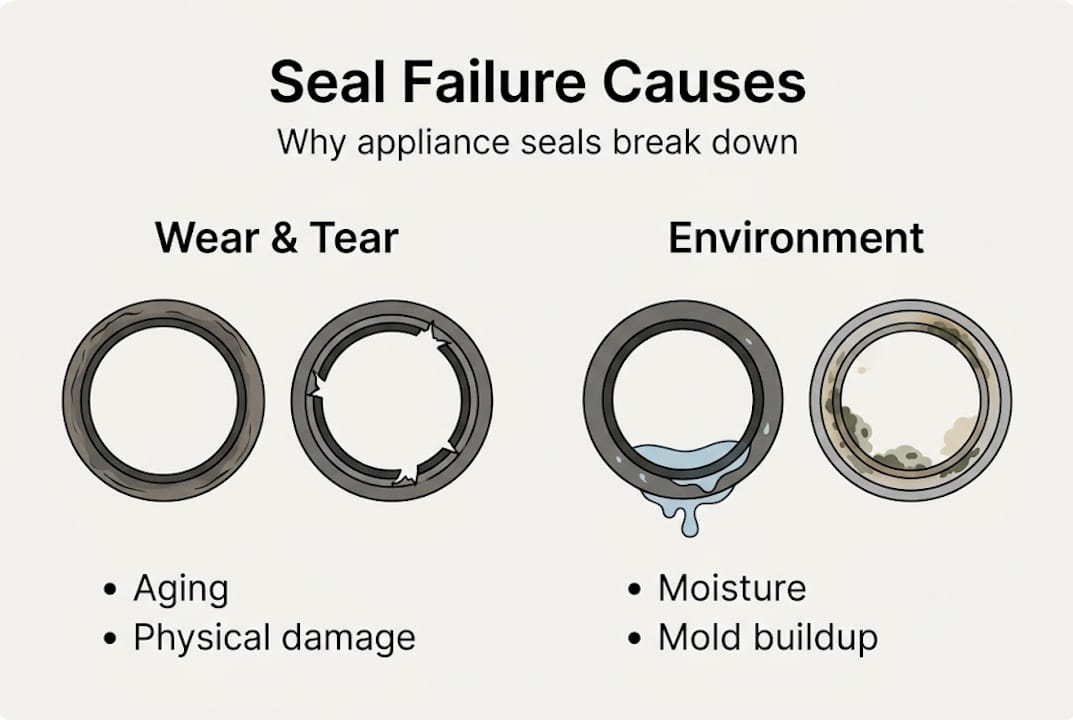
Understanding appliance seals: What they do and why they fail
Appliance seals are the flexible strips, gaskets, and boot-shaped rubber components that create an airtight or watertight barrier between moving parts. Your refrigerator uses a magnetic door gasket to hold cold air inside. Your front-load washer relies on a rubber boot seal around the door opening to keep water from escaping during the spin cycle. Ovens use door seals to trap heat and maintain cooking temperatures. Without these components working correctly, every appliance becomes less efficient and more prone to damage.
Common appliance leak causes include age-related cracking, mold buildup from trapped moisture, and physical tears from everyday use. But in Monmouth County, there is an added challenge: coastal humidity and salt air accelerate rubber degradation faster than in inland areas. That means seals that might last eight or ten years in a drier climate may show signs of failure in five or six years here.
Appliance seals can often be repaired or replaced with DIY methods, making them one of the more approachable home repairs. But catching the problem early matters. Consumer Reports appliance care consistently points to ignored gasket wear as a leading reason appliances underperform well before their expected lifespan.
Seal failure red flags to watch for:
- Condensation or frost forming inside the refrigerator near the door edge
- Visible cracks, tears, or stiff spots in the rubber
- Water pooling in front of your washer after a cycle
- Food spoiling faster than normal in a fridge that seems to be running fine
- Musty or mildew odors coming from your appliance
- Higher than normal electric or gas bills without a clear reason
| Appliance | Seal type | Average lifespan | Failure risk factors |
|---|---|---|---|
| Refrigerator | Magnetic door gasket | 5 to 10 years | Mold, coastal humidity, door misalignment |
| Front-load washer | Rubber boot seal | 5 to 8 years | Mold, debris, salt air exposure |
| Oven | Fiberglass door seal | 8 to 12 years | Heat cycling, grease buildup |
| Dishwasher | Door latch gasket | 6 to 10 years | Hard water deposits, age |
Following NJ appliance maintenance tips tailored to coastal environments can add years to any of these components. Now that you know what can happen with a bad seal, let’s look at what you will need before starting any repair.
Tools and materials: What you need before you start
Walking into a seal repair without the right tools is a fast way to damage the appliance or injure yourself. Gathering everything before you start saves time and prevents those frustrating mid-repair trips to the hardware store.

Proper tools are critical for safe, effective seal replacement, including screwdrivers, heat sources, and cleaning supplies.
Basic tool checklist for appliance seal repairs:
- Phillips and flathead screwdrivers
- Nut drivers or a socket set for panel bolts
- Hairdryer or heat gun on a low setting
- Soft cleaning cloths and a sponge
- Mild dish soap and warm water
- White vinegar (for mold removal)
- Silicone sealant or gasket adhesive for minor cracks
- Needle-nose pliers for spring clamps on washer boots
- A flat plastic pry tool to avoid scratching panels
- Nitrile gloves and safety glasses
| Appliance | Unique tools needed | Seal part to source |
|---|---|---|
| Refrigerator | Hairdryer, Torx screwdriver | Model-specific magnetic gasket |
| Front-load washer | Needle-nose pliers, clamp removal tool | OEM or aftermarket boot seal |
| Oven | High-temp silicone, stiff brush | Fiberglass door seal strip |
For DIY appliance maintenance tips that help you stay organized, one of the most overlooked habits is labeling. When you remove screws and panels, put each screw in a small labeled bag. Reassembly becomes straightforward and you will not spend twenty minutes hunting for the right fastener.
Pro Tip: Before ordering parts, check whether your appliance is still under warranty. Attempting a DIY repair on a warranted appliance can void coverage and cost you more in the long run.
For parts sourcing in Monmouth County, local appliance parts dealers in Freehold and Red Bank typically carry common gaskets. Online retailers like Consumer Reports repair advice regularly recommends verified OEM parts for best fit and longevity. Always match the part number from your appliance’s label, usually found inside the door frame or on the back panel. With your tools gathered, you are ready to tackle the repair step by step.
Step-by-step guide: How to repair or replace appliance seals
Before touching anything, unplug the appliance from the wall and move it away from the wall slightly to give yourself room to work. Clear the immediate workspace and keep a towel handy in case of residual water.
Refrigerator seal replacement:
- Open the refrigerator door and locate the retaining strip or screws holding the old gasket in place.
- Peel back or unscrew the old seal, working from one corner around the full perimeter.
- Clean the door channel thoroughly with warm soapy water and white vinegar to remove any mold or adhesive residue.
- Soak the new gasket in warm water for 10 to 15 minutes or use a hairdryer on low to make it pliable.
- Press the new seal into the channel starting at the top corners, working around to avoid bunching.
- Use the dollar bill test to confirm a tight fit: close the door on a dollar bill and check for resistance at multiple points.
- Plug in and monitor for condensation over the next 24 hours.
Front-load washer boot seal replacement:
- Open the washer door and locate the outer spring clamp holding the boot to the door frame.
- Remove the clamp using pliers and peel the front of the boot seal off the tub ring.
- Pull back the front panel after unscrewing the lower kick panel and removing the door latch screws.
- Disconnect the inner clamp at the back of the boot and pull the old seal free.
- Clean the tub opening completely before positioning the new boot.
- Align the drain holes at the bottom, then seat the inner clamp first.
- Fold the outer lip over the door frame and secure the outer spring clamp firmly.
Safety warning: Never use a heat gun near exposed wiring or plastic components inside the washer cabinet. Always confirm the machine is unplugged before reaching inside the drum area.
Washer seal replacement typically takes 1 to 2 hours for a first-timer. Monmouth County’s coastal humidity means more frequent inspections are smart, ideally every six months. For a list of fast appliance fixes that local techs rely on, seasonal checks top the list.
Pro Tip: Always dry-fit the new seal without adhesive first and do a test door closure. Catching alignment issues before permanent installation saves you from starting over.
Even with careful steps, a few common mistakes can set you back. Here is how to avoid them.
Troubleshooting and common mistakes: What to watch out for
Most failed seal repairs come down to a handful of avoidable errors. Knowing them in advance puts you well ahead of the curve.
Top mistakes to avoid:
- Installing the seal upside down or backwards (always check orientation markings)
- Skipping the softening step, which causes bunching and poor door contact
- Over-tightening retaining screws, which distorts the seal channel
- Using bleach or abrasive cleaners on rubber, which accelerates cracking
- Ignoring door hinge alignment before installing a new seal
Pro Tip: Leave your washer door slightly open after every cycle. This reduces moisture buildup inside the boot seal, which is the primary cause of mold in front-load machines.
In Monmouth County specifically, warped doors or hinges and salt-air-driven corrosion often undermine a perfectly good new seal within months if left unaddressed. If your door frame feels soft, bent, or does not sit flush, correct that before replacing the seal or you will be back doing the job again soon.
Studies and local repair data suggest that up to 50% of repeat repairs come from underlying fit and alignment problems that were never fixed during the first attempt. That is a significant number and mostly preventable.
Knowing when to call a professional matters just as much as knowing how to do the job. If your appliance is under warranty, the repair requires major disassembly of components like control boards, or leaks continue after two attempts, it is time to bring in a specialist. Want to cut appliance repair costs over the long term? Catching problems before they compound is the most reliable strategy. Local appliance expertise is especially valuable when coastal conditions complicate what should be a simple fix. Once the job is done right, here is how to confirm your appliance is sealed and working efficiently.
How to confirm success: Testing and maintaining your new seals
The dollar bill test is your first and most reliable confirmation tool. Close the appliance door on a folded dollar bill and try to pull it out with moderate resistance. Do this at four or five spots around the door perimeter. If the bill slides out easily anywhere, the seal is not seated correctly in that area.
Post-repair verification checklist:
- Listen for the sound of cold air escaping around the refrigerator door
- Check for new condensation forming inside the door edges after 24 hours
- Watch for water on the floor in front of the washer after a full cycle
- Monitor your energy bill over the next billing cycle for any improvement
- Smell for musty odors that could indicate remaining mold inside the seal channel
Well-maintained seals can extend appliance life by several years, which is meaningful when you consider the cost of replacing a refrigerator or washer outright. Routine care does not require much time. Wipe seals monthly with a damp cloth and mild dish soap. Avoid abrasive pads or solvents. Use a thin layer of petroleum jelly on rubber seals twice a year to keep them flexible, particularly important in coastal New Jersey where salt air dries rubber faster.
Refer to a detailed appliance maintenance checklist to keep track of all your service intervals in one place. Consumer Reports on maintenance recommends setting a calendar reminder every six months for a visual seal inspection, which is especially practical for Monmouth County households dealing with year-round coastal moisture. With everything covered, here is the hard-won wisdom we think most DIY seal repair guides miss.
The overlooked truth about appliance seal repairs
Most guides treat seal replacement as a purely mechanical task. Pull out the old one, press in the new one, done. But after decades of serving Monmouth County homes and businesses, we have seen a different reality play out constantly.
The seal itself is rarely the whole story. What usually sends a homeowner back to square one is a door that sits slightly off, a frame warped by humidity, or a boot that was never properly softened before installation. These are the details that separate a repair that lasts two weeks from one that lasts five years.
Coastal New Jersey creates genuinely different conditions than what most appliance manufacturers account for. Salt air degrades rubber faster, corrodes metal clamps, and promotes mold growth in ways that inland homeowners simply do not experience. The benefits of professional repair are most visible precisely in these situations, where local knowledge of environmental factors makes a real difference. DIY is a solid option for a straightforward leak or a fresh tear. But if you are seeing the same problem return, or if you spot mold deeper than surface level, getting a specialist involved is not an admission of defeat. It is just the smarter investment.
Get professional appliance seal repair—fast and local
If you would rather skip the tools and let an experienced technician handle it, Expert Appliance Repair has been serving Monmouth County homes and businesses since 1988. We offer same-day service on all major seal repairs, from refrigerator gaskets to washer boot seals, with upfront pricing and no hidden fees.

Whether you need a quick seal fix or a full maintenance plan, we work with all major appliance brands we repair and offer appliance and vacuum repair for both residential and commercial customers. Small business owners in Monmouth County can also explore our business appliance maintenance guide for tailored service options. Call us today or schedule online to get your appliance running tight and efficient again.
Frequently asked questions
How do I know if my appliance seal really needs replacing?
Check for leaks, excess condensation, mold, or if a dollar bill slips easily between the door and frame. Any of those signs means your seal likely needs attention.
Can I repair a minor tear in an appliance seal, or do I need a full replacement?
Small cracks and tears can be patched with silicone adhesive, but a full replacement gives you better long-term efficiency and peace of mind.
What’s the easiest way to soften a new refrigerator or washer seal before installing?
Soak the seal in warm water for 10 to 15 minutes or run a hairdryer over it on a low setting to make it pliable and easier to seat correctly.
Should I call a professional for every appliance seal problem?
DIY works well for minor repairs, but hire a pro if your appliance is under warranty, the disassembly is complex, or leaks persist after repair attempts.
How often should I check my appliance seals in coastal New Jersey?
Check seals every six months because coastal humidity and salt air in Monmouth County accelerate rubber wear significantly faster than in non-coastal areas.
Recommended
- How to replace appliance parts: a 2026 DIY repair guide – Expert Appliance
- How to Repair Refrigerator: Step-by-Step Guide for Fast Results – Expert Appliance
- Master the Appliance Service Workflow for Fast Repairs – Expert Appliance
- How to Prepare for Appliance Service and Ensure Fast Repairs – Expert Appliance